Friday, June 29, 2012

Happily Ever After


Hello and welcome.  Wow, is it warm and toasty outside today.  Perfect time to break out the craft supplies and get to work.  I finished this card that was made for a co-workers wedding.  His bride chose purple for the wedding so I wanted to incorporate those colors in the card.  I started by embossing white cardstock with the Victoria embossing folder from Cuttlebug. 


To make the focal point, I used the heart border die cut from Papertrey Ink.  I cut the border in several shades of purple cardstock and then layered them on top of one another and trimmed the strip to fit the card.  Rather than layering them right on top of one another, I offset the top layer to the right so only the bottom portion of the heart is showing in the lighter color.


After die cutting the borders, I noticed the left over piece had a pretty cool looking border also so I added a strip on top of the hearts to provide the perfect spot for the sentiment.


This card is being entered in the layers challenge at Young Crafters Unite.  Click here to check out the contest and play along. 


Happy Crafting
-Teddra


Wednesday, June 27, 2012

Chocolate Chip Cookies


Hi-ya and Welcome to Adventures In Baking.  After the variety of sweet treats I've baked in the past six months I realized I haven't focused on the most basic treat of all .... the chocolate chip cookie.  My aunt and uncle lived in Park City, Utah for several years and the recipe I'm using originated in that area.  My aunt sent me the recipe from a book titled Chocolate Snowball.  The author of the book, Letty Halloran Flatt, is the executive pastry chef at the Deer Valley Resort in Park City and the cookies, cakes and muffins are sold in the resort bakery.  The book is available on Amazon (I checked.  And added it to my wishlist.)   

The ingredients.  Flour, sugar, eggs, yada, yada, yada. 


Let's get started.  Combine flour with the baking soda and salt in a small bowl.  Set aside.


Next step.  Cream the butter, sugar and brown sugar together until light and fluffy.  Add the eggs and vanilla.  Mix well. 

What?  You wanted to see yet another photo of butter and sugar creamed together.  Nope, didn't think so.  I'd like for you to meet Betty.  (I name quite a few of my electronics, don't you?  Yeah, I'm weird like that).  Anyway, back to Betty.  Betty is my hand mixer.  I named her after Betty Crocker.  I'm contemplating her retirement.  I'm thinking about purchasing a Kitchen Aid stand mixer.  Not that I need one, Betty does a fine job.  But the Kitchen Aid mixers are so pretty.  In a soft buttery yellow.  Sigh.  I have the $$$ set aside to make the purchase but just can't make myself do it.  Maybe that's my answer right there.  I shouldn't have to make myself buy a mixer when I have a perfectly capable one already.  I have this argument with myself at least once a month.  Where were we?  Oh yeah, cookies. 


Final step.  Add the flour mixture and stir in the chocolate chips. 


The taste test.  Oh yeah.  These are five-star cookies.  Bakery quality.  How did I get them so thick you ask? Rather than using a flat cookie sheet or jelly roll pan,  I used my whoopie pie pan.


I filled the wells with cookie dough so they wouldn't spread out and all the cookies will come out the same size.  They're sooooo good.  They're crispy on the outside but soft and chewy on the inside.   Best when served with a glass of cold milk.


The clean up.  I made 27 total cookies.  After the first 12, I added 3/4 cup of chopped walnuts.  I figured the thickness of the cookie could handle walnuts. 

On the next episode of Adventures In Baking....I'm thinking it needs to be something festive for the 4th of July.  Any suggestions?

Adios
-Teddra


Monday, June 25, 2012

Papertrey June Blog Hop Challenge


Hello and Happy Monday to you!  Today I'm sharing a card for Papertrey's monthly blog hop.  This month we were to use inspiration from the following photo.  One of the things that really pulls me into the scene is the grey textured background, so that was my starting point.

June-blog-hop


All supplies are from Papertrey Ink
Cardstock: Harvest Gold, Smokey Shadow, Soft Stone, White
Dies:  Limitless Layers 2.25" squares
Ink:  Harvest Gold, New Leaf and Smokey Shadow
Ribbon:  New Leaf
Stamps:  Basic Background: Tin Types, Garden Variety

Thanks for stopping by!
-Teddra

Friday, June 22, 2012

Mother's Day


Happy Friday!  Just popping by today to show you a card I recently made.  Earlier this week, when I posted my Father's Day card, I realized I never shared the card I made for Mother's Day.  It's one of my favorites.  My mom is a quilter so I was inspired to make a patchwork card.  I used six different patterned papers from Authentique with shades of turquoise, orange and cream.  I cut four, one inch squares of each design and layered them on a piece of turquoise cardstock.  I also used a few die cuts to layer on as an accent piece and a little piece of ribbon to tie it all together. 

Have a great weekend!
-Teddra

Wednesday, June 20, 2012

Banana Pudding


Hi and welcome to a special Father's Day edition of Adventures In Baking.  I knew I'd be visiting my Dad this past weekend so I made one of his favorite desserts, Banana Pudding.  This is my grandmas one and only dessert recipe.  Well, this and fruit salad.  And she's really good at dialing the phone number for Larry's House of Cakes.

Banana Pudding
Recipe from the kitchen of Violet Jeter
3 large eggs
3/4 cup sugar
4 tablespoons flour
1 1/2 cup Milnot
1 1/2 cup water
Vanilla Wafers
3 bananas

Meringue
1/2 teaspoon vanilla
1/4 teaspoon cream of tarter
6 tablespoons sugar


The ingredients.  Not too many ingredients and no instant pudding here ..... this baby's gonna be made from scratch.

Let's get started.  The first step is to separate the egg and yolk.  Because I'm at my parents house, because my mom had this (not)  handy egg separator thing and because I have a severe aversion to eggs, I made some amazingly grossed out faces while completing the separation.  Crack the egg (no problem), pour the egg into the separator (no problem), let the white separate from the yolk (problem).  Those are some slimy, squishy, goopy egg whites.  I had to use my hands.  It wasn't pretty.  Not that I have a lot of experience separating eggs, but I found it much easier to toss the egg back and forth between the two cracked shells to accomplish the separating.  And I mean lightly toss, not pizza pie toss. More like juggle back and forth. But not like a clown at a circus juggling oranges. Maybe pass is the word I'm looking for.   Pass the yolk back and forth.  But not like a football ..... Nevermind, just separate the eggs.  And let's not do that again anytime soon.

Next step.  Beat the sugar, flour and egg yolks.  Gradually add the Milnot and water.
 

And then.  Cook on the stove top over Medium heat until it's thick, 10-15 minutes.  Stir constantly.  You don't want to bring it to a full boil, but when it starts to bubble, you're just about finished.  Continue stirring over the heat for 2 additional minutes.  Remove from heat and set aside to cool and thicken. 

Build it.  While your pudding is cooling, begin the layering process.  In a large, oven safe bowl, place a single layer of Vanilla Wafers.  Top the wafers with a layer of sliced bananas.  On top of the bananas spoon one -third of the pudding. 


Repeat two more times for a total of three layers each of wafers, bananas and pudding.


Final step.  The meringue.  Begin by beating the egg whites, vanilla and cream of tarter.  Slowly add sugar and continue beating until the mixture forms firm peaks.  Spread the meringue on top of the pudding and bake at 350 degrees for 15 minutes or until the topping is golden brown.  Like a huge toasted marshmallow. 


The taste test.  I would say four thumbs up but the two people tasting the pudding couldn't put their spoons down long enough to show me their thumbs.  I'd say it was a hit.   This was the first dessert I've made that I didn't taste for myself.  I'm OK with that. 

The clean up.  This makes one large bowl of pudding, but would be really cute in single serve ramekins.  And I have it on good authority that it's a make it and eat it kinda dessert.   Don't save it for the next day or try to make it too far in advance. 

On the next episode of Adventures In Baking I have a classic cookie recipe sent to me by my aunt.   I'm looking forward to the taste test on this one.

Happy Baking
-Teddra


Monday, June 18, 2012

Father's Day


Hello and happy Monday!  Did you have a nice weekend?  I traveled south to spend a few days with my Dad and celebrate Father's Day.  Here's a pic of the card I made for him to go along with his present (which I'll post on Wednesday).  Clean and simple.  Love the color combo of blue and kraft.  Oh, and he has a long relationship with ice cream ..... hence the ice cream cone in the center. 

Thanks for stopping by and have a great week!
-Teddra

Wednesday, June 13, 2012

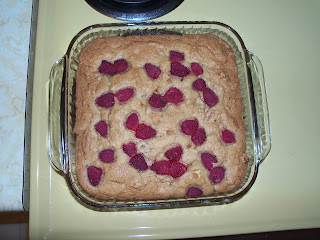
Raspberry Pecan Blondies


Hello and welcome to Adventures In Baking.  Why do I call it 'Adventures' you may ask?  Well, I am, admittedly, limited in my baking ability and am working my way through various recipes with a wing and a prayer.  Sometimes it works.  Sometimes it doesn't.  I like the precision of baking.  No pinch of this or dash of that.  Baking is specific.  The instructions include everything from the measurements of each ingredient to directing the baker to scrape the side of the bowl while mixing, to what brand or type of an ingredient to use.  I'm trying new things.  I'm discovering new products.  I'm re-defining my dessert likes and dislikes.  It's an Adventure!

Let me give you a little insight into how today's treat came to be.  For the past 6 months or so, I've been searching through the blog-o-sphere searching for recipes.  One of the items I continually read the title for was Blondies.  Now, I don't know why exactly, but I kinda had, in the back of my mind, the idea that Blondies were some type of cookie.  Then, the other day, I saw this photo of Raspberry Pecan Blondies and decided to check it out.  I'm not going to embarrass myself further and tell you how long it took me to figure out that Blondies are basically Brownies without the chocolate, but I decided to give them a try.  Here's the results:

The ingredients.  Had to purchase Nutmeg.  And fresh raspberries.  I also have a new bag of flour.  I wonder how much flour I've gone through so far this year?  And butter?  I'd probably scare myself if I went back through the recipes and figured that one out! 

Let's get started.  In a small bowl, combine flour, baking powder, baking soda, salt and nutmeg.  Set aside.  That little 1/4 teaspoon of nutmeg sure has a strong scent. 

Next step.  In a large bowl, beat butter and brown sugar with an electric mixer until light and fluffy.  See, this is one of those specific instructions:  'with an electric mixer'.  In this day and age is anyone going to mix these by hand?  I don't think so.  Add eggs, one at a time, and mix well after each addition.  **I figure you've seen enough pictures of beating butter and sugar since it's one of the first steps to every single recipe so I'm going with something a little different today.  This is something my Mom taught me a few weeks ago.  Something I'd never thought about before.  She was making something (I don't remember what) and cracked open a 'bad' egg (I won't go into details like she did when telling me, let's just say ick).  Luckily she had cracked it into a small bowl before adding it to whatever she was making so she was able to dispose of the egg and continuing on instead of starting all over with fresh ingredients.  So there's my photo of a cracked egg.  In a purple bowl.  Nice colors.

Final step.  Add vanilla and lemon zest.  I didn't feel like zesting a lemon so I left that part out.  Add dry ingredients and beat just until combined.  Stir in pecans.  Pecans.  I ran out of pecans after the last thing I made that called for pecans.  That was several weeks ago.  So, of course, when I added them to my shopping list this week the store (large, nationwide retailer) was out of pecans.  Is there a pecan shortage somewhere?  Are there a lot of Memorial Day recipes that use pecans?  Did the store move the pecans but leave all the other packaged nuts in the same place?  (Doesn't it drive you  crazy when stores move things around for no obvious reason?)  I tried a sister store of the first (same company, different location) and found pecan halves but not pecan pieces.  Maybe it's a company-wide distribution problem, but now it's my problem.  Now I have to chop the pecan halves into pecan pieces.  I'll stop now.  That was my pecan rant.   

Taste test.  Spread dough into pan.  Sprinkle raspberries over top of dough.  I thought this was a little strange that the raspberries weren't more in the middle, but they are kinda squishy.  Probably wouldn't be easy to mix them in with the thick batter. 

I can still smell the nutmeg.  They're pretty good.  I think I might like them better without the raspberries and with chocolate chips.  Or butterscotch chips.  Or just with the pecans.  Or walnuts.  So  many options.  Guess I know why there are so many Blondie recipes on the Internet.  You can probably put just about anything in these. 

The clean up.  I used a 9x9 inch pan so I cut 9 pieces.  The original recipe used the Baker's Edge pan which is 12x9x2.  Have you ever used a Baker's Edge pan?  It's a genius idea.  I put one in my Amazon wishlist. 

Next week, I'm heading down south for Father's Day.  Probably my last trip there for a while.  I have the recipe picked out.  It scares me. 

Till next time
-Teddra


Friday, June 8, 2012

Peace and Joy


Happy TGIF!  Sooooo looking forward to this weekend.  Not much on the schedule so lots of crafty time.  I really want to focus on my Project Life album.  I'm up to date with the printing the photos, but I still need to do the title cards and journaling.  My PL album is a little different since it's only focusing on my crazy Adventures In Baking, so I'm combining PL core kit items with scraps from my stash. The pages take a little longer this way, but I'm OK with that. 

Recently, I was trying to catch up with my monthly Christmas Card schedule.  I completed 4 cards for March and 4 more for April.  This is the inside of the cards I made for March.  I don't usually do anything fancy with the inside, but I thought I'd try it out.  I like. 

Have a great weekend!
-Teddra

Wednesday, June 6, 2012

Whoopie Pies with Raspberry Filling


Hello and happy Wednesday evening to you.  I took a little trip to visit the family this past weekend, so Adventures In Baking went on the road again.  I'm just gonna jump right into this one.  Whoopie Pie.  It's not like any pie I've ever seen.  More of a sandwich cookie.  Messy.  I purchased my Wilton Whoopie Pie pan several months ago when it was on sale.  I didn't actually intend to make Whoopie Pies.  I was kinda picturing using it for cookies.  If you've never seen the pan, let me explain it a little.  It's about the size of a muffin tin, maybe a little larger.  It has 12 shallow wells about 2.5 inches in diameter.  I thought it would be useful for producing thick chocolate chip cookies.  The dough can only spread out so far in the wells so they'll stay kinda thick.  It was just an idea.  But an idea I intend to try in the near future.  The pan came with a couple of recipes and I figured if they made the pan, they should have a decent recipe. 


The ingredients.  A new ingredient, Marshmallow cream.  A questionable ingredient, pink food coloring.  (I call this ingredient questionable due to this post here.  Scary).  And a few stalwarts, butter, sugar and flour.


As you can see from the above photo, not exactly at the starting point!  I completely forgot to take photos of each step along the way.  So, I have pics ..... they just don't really go with the description.  Just go with it, lol!

Let's get started.  Beat butter and sugar until light and fluffy.  Add egg and vanilla and beat some more.


Next step.  In another bowl (not the bowl in the picture above!), sift together the flour, baking powder and salt.  Add half the dry ingredients into the butter mixture and mix on low speed.  When dry ingredients are almost incorporated, add the milk.  Continue to mix on low speed until all ingredients are almost incorporated.  Add the remaining dry ingredients.


Final step.  Spoon batter into each cavity. 


Assembly.  In a large bowl, beat the butter until creamy.  Add sugar and salt.  Add marshmallow creme and vanilla.  Blend well.  Add food coloring.  **I was dreading this part.  I was fearful of turning the filling into a neon mess.  This time, I used a toothpick and barely dipped it in the food coloring and I was rewarded with this beautiful pastel pink.  A very distant cousin the my neon pink cupcakes from February.  Spread raspberry jam on one cake and filing on the other cake.  Sandwich together. 

 
Taste test. Two out of three thumbs up.  Guess who gave it the thumbs down, yep, me.  Don't get me wrong, I ate 3/4th's of the thing.  I just wasn't even tempted to have it again.  The two thumbs up both seemed to really enjoy them.  There are several recipe books out right now devoted entirely to the whoopie pie.  They seem to be the 'in' thing right now.  There really are a ton of options for flavor combinations.  I'll probably try them again.  I'm thinking chocolate with peanut butter filling.  One change I know needs to happen, is they need to be little smaller.  These things are monsters, thickness wise, which contributes to the messy.  And I think they need to be chilled or even frozen right after they're made.  I think that would help hold them together.  Live and learn.  That's what this whole adventure is all about.

The clean up.  The recipe said it made 24 cakes.  (Why is it called a whoopie PIE??  There's nothing PIE about this).  And 24 cakes sandwiched together make 12 pies.  I ended up with 18 cakes/9 pies,  So, yeah.....too thick.   But definitely enjoyed. 

So that's this weeks adventure.   Haven't decided on what to make next.  Maybe a brownie??

Have a great week
-Teddra   


Tuesday, June 5, 2012

46th Anniversary


Hi-ya!  Thanks for stopping by today.  I have a quick card to share today.  This is the card I made for my parents 46th Anniversary which is today, June 5.  Happy Anniversary!

I used the large Mehndi Medallion stamp from Papertrey Ink and colored it in with copic markers in shades of green and gold.  There are so many possibilities by simply changing up the colors. 
See ya back here tomorrow for the next episode of Adventures In Baking ..... Whoopie Pies!

Till then
-Teddra

Saturday, June 2, 2012

Cheveron Kleenex Box


I know.  You're looking at this photo of a Kleenex box and wondering what the heck you've stumbled into.  I wonder the same thing at least once or twice a week.  I was getting ready for work one morning last week and as I was brushing my teeth, I happened to focus in on this box of Kleenex that sits on the bathroom counter.  This box has been there for months but, for some reason, I'd never focused on the pattern.  I started getting ideas.  The wheels started turning.  And I had to go to work for 9 hours.  Grrrrr.  Don't ya just hate when you get all inspired and can't do a thing about it. 


Later than night, I ran in from work and started pulling everything together that I'd need to make this card.  I'd had all day to think about it and knew just what I wanted to make.  Quickest card ever...... inspired by a Kleenex box. 

Have a great weekend!
-Teddra