Monday, October 29, 2012
Friendship
Hello and Welcome. Just stopping by to share a few pictures from their most recent RV trip from this past summer. Another RVing (is that a word?) couple they are good friends with set out to explore a couple of National Parks in the Western US.
I used Jillibean Soup's Sweet and Sour Soup for the patterned papers. So bright and cheery!
Have a great week!
-Teddra
Friday, October 26, 2012
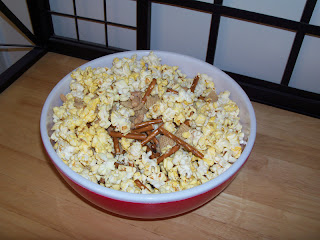
Candy Snack Mix
Hello and Welcome to an extra episode of Adventures In Baking for this week! I thought I'd finish October with a fun little treat that's great for parties and party favors. I'm using the basic recipe, minus the bugles, from Cookies and Cups that can be found here.
The ingredients. Most of your major snack categories are represented. Peanuts, popcorn, pretzels, M&M's and Chex Cereal.
Let's get started. Mix the popped popcorn, pretzels, peanuts and cereal in a large bowl. Spread the mix out on a large jelly roll pan sheet.
Next step. In a saucepan melt butter, sugar and corn syrup. Bring to a boil and boil without stirring for 4 minutes. Remove from heat and pour over popcorn mix.
Final step. Bake for 30 minutes stirring every 10 minutes. Remove from the oven and transfer to a sheet of parchment paper. Sprinkle M&M's on top. Cool and break into pieces.
Taste test. It's sooooo good! Homemade caramel corn. I wish I'd broken the pretzels into smaller pieces, or used Goldfish pretzels. There are so many variations to this basic recipe. You can switch up the candy or use a different type of cereal. I bet cashews would be a tasty addition.
I've kept my mix in a sealed Ziploc bag and it's just as crunchy as it was the first day. I'm heading out of town this weekend for an early Thanksgiving dinner with family and taking the bag of mix with me. I know it's going to be a big hit!
Enjoy
-Teddra
Wednesday, October 24, 2012
Orange Soda Cupcakes
Hello and Welcome to Adventures In Baking! This week we're wrapping up our month long Halloween themed treats with Orange Soda Cupcakes. I'm using a recipe from The Big Book of Cupcakes. Do these cupcakes look yummy or what?
The ingredients. Pretty simple. Well, except for the orange soda of course.
Let's get started. Pour all the ingredients into a bowl. Mix. (The recipe only uses 1 cup of orange soda). Can't get much easier than this.
Next step. Fill the muffin liners with batter. It's a nice peachy-orange shade.
Final step. I went a different route with the frosting this time. Instead of making my own using powdered sugar, I purchased this Frosting Creations container and flavor packet from Duncan Hines. The frosting is white and then you add the flavor packet and stir it together in the container. It's super easy and the orange flavor is amazing. It's not too sweet but adds the perfect punch of orange. I don't remember how many different flavors they have, but I'll definitely use them again. So much easier.
Taste test. These are really good. The cake is light and moist and I've already given my opinion on the frosting. I much prefer the sugar sprinkles over the black and orange sprinkles . If orange isn't your thing you could use lemon-lime or anything else that tickles your taste buds. Just make sure it's carbonated.
The clean up. The recipe yielded 12 cupcakes so if you're making them for a larger group I'd definitely try a few different flavor combos. Grape sounds good. And strawberry. And cherry. Well, you get the picture!
Check back in later this week for an extra episode of Adventures In Baking that's super easy and fun!
Enjoy!
-Teddra
Monday, October 22, 2012
Disney Dream
Hi and Happy Monday! I'm back today with a scrapbook page for my Family album. This page is all about the cruise my parents went on in January 2011 aboard the Disney Dream.
I used My Mind's Eye Stella and Rose patterned papers and embellies.
See ya soon
-Teddra
I used My Mind's Eye Stella and Rose patterned papers and embellies.
See ya soon
-Teddra
Wednesday, October 17, 2012
Candy Corn Sugar Cookies
Happy Wednesday and Welcome to Adventures In Baking! To continue with the Halloween theme this month, today we're baking sugar cookies and topping them with one of the quintessential of all Halloween candies ...... Candy Corn! (with a few M&M's thrown in too).
I'm using a recipe from Martha Stewart that I found here. This is the second Martha Stewart cookie recipe I've made and I loved the first one, the Surprise Cookies, so I had high hopes for these as well. Her recipes are quick, don't have a lot of ingredients and make a manageable amount of cookies.
The ingredients. Like I said, not a lot of ingredients. I thought I'd try using this huge bag of whole wheat flour. Just so ya know ...... it didn't work out too well. I'd stick with regular old all purpose flour if you try these yourself.
Let's get started. Place butter and sugar in a bowl. Beat with a wooden spoon until combined. Yep, that's what it says. With a wooden spoon. Not a metal spoon. Not a plastic spoon. A wooden spoon. I just used a hand held mixer. This may have contributed to my troubles. But I really don't see how.
Next step. Beat in egg yolk, vanilla, baking powder and salt. Why just the yolk you ask? I have no idea. Add flour and mix until a dough forms. Ummmmmmm, yeah. Never did get it to the dough stage. And I mixed it for over 10 minutes. I thought the mixer was going to start smoking.
So now what do I do? Well, let's think about this. I've got a little bit of baking experience under my belt now. Surely I can figure this out....... Well, I know it's too dry and nothing will stick together so I need to add some moisture. I could add another egg. The whole egg, not just the yolk. Or I could add some butter. And since I have a well documented aversion to eggs, I decided to add a couple tablespoons of butter. Well, at least it's much closer to dough than it was before but it isn't very firm. Maybe I'll stick it in the fridge for a little while.
While my pseudo dough is in the fridge let's look back at the recipe. The recipe is pretty straight forward. Add this, mix that. Darn that wooden spoon thing. Or maybe it's the whole wheat flour. Let's try again but make the chocolate version included in the notes. This time I used all purpose flour and added cocoa powder (and still didn't use a wooden spoon). And the dough forms just like the instructions intended.
Now let's see how the dough in the fridge is doing. Hmmmmm. That doesn't look so good. Let's scrap it and start over. And so I made the dough again, this time using all purpose flour instead of whole wheat and without the cocoa powder. It still took a very long time for the dough to form, but I eventually got there. I think it may actually have something to do with the amount of flour. The chocolate version uses 1/4 cup less flour and it formed into dough realtively easily.
Final step. Gently press the candy into the center of the cookie. The cookies with M&M's kinda look like eyeballs.
Taste test. Definitely a sugar cookie. Very sweet. Kids will love them.
The clean up. The chocolate dough made 19 cookies and the regular dough made 16 cookies. And these are pretty tiny cookies. The cookies aren't much larger than the candy pieces. The recipe said a batch yielded 36 cookies and I yielded that many for two batches. I wrapped up a bunch for someones birthday and I'll take the rest to work.
Well, that's it for this week's adventure. One final Halloween inspired baked delight to go to finish up October. It's gonna be a good one.
Enjoy!
-Teddra
Wednesday, October 10, 2012
Caramel Apple Scones
Hello and Welcome to Adventures In Baking! This month's treats are focusing on the Holiday at the end of October, Halloween! This week, I'm putting a little twist on a gooey fall tradition, Caramel Apples. The recipe I'm using can be found right here at Recipe Girl.
The ingredients. As you'd expect .... except the Greek Yogurt. That one made me go hmmmmmm. I've never tasted Greek Yogurt and the few people I know that have tried it, didn't like it. The general consensus was that it was very sour. I'm just fine with my Dannon Strawberry yogurt thank you very much.
Let's get started. Prepare the apples. Melt butter over medium heat. Add the apples. Cook until the apples are softened. Stir in cinnamon and set aside to cool.
Next step. Prepare the dough. Mix together flour, sugar, baking powder and baking soda. Add the butter until you get coarse crumbs. Stir in yogurt and apples until the dough comes together. The dough will be dry. Super dry. Just use your hands.
Final step. Bake the scones. On a lightly floured surface, form a 14 x 4 inch flattened log. Cut the log into triangles. Bake.
Taste test. Ice the scones. In a saucepan, heat butter until melted. Stir in brown sugar and milk. Cook for 1 minute. Transfer to a bowl and cool slightly. Stir in vanilla and powdered sugar. Beat until well blended and to desired consistency. Drizzle over scones.
Hello yumminess! These are excellent with or without the caramel icing but the icing just adds that little bit of sweetness that sends them over the top. I, ahem, felt the need to taste test two pieces, you know, just make sure my original opinion wasn't going to change, lol! I have the remainder in a sealed container just waiting to be warmed up for breakfast tomorrow. Or maybe dessert tonight. Or an evening snack. These aren't gonna last long around here. Try them out for yourself and let me know what you think.
The clean up. I made 12 scones. The icing part of the recipe made double what was needed so if you prefer a little 'extra' icing there's plenty.
I was a little leery about another scone recipe after the Strawberry Almond Scone (if you can call them that) disaster from this summer, but these were quick and easy. Definitely one for the recipe box.
Next week, another Halloween staple.....Candy Corn.
Enjoy!
-Teddra
Monday, October 8, 2012
4th
Good Morning and Welcome to Monday. How was your weekend? Mine went by way too quickly. Luckily, I still have today to enjoy a little free time before the work week begins yet again. I'm hoping to have some news on the work front sometime soon, but the wait is driving me nutty!
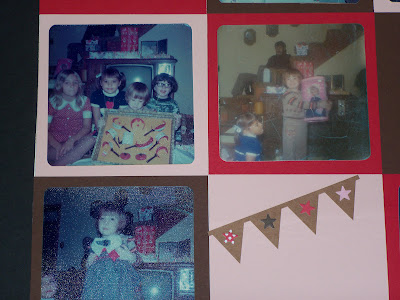
I have another layout I worked on last weekend to share with you today. These are photos of my 4th Birthday. The photos are fading, but I'm glad I have them. Isn't my little Mickey Mouse cake cute?
I used Jillibean Soup's Hearty Barley patterned papers and made the banners using a Studio Calico border strip that was cut into 3 pieces.
Ah, the 70's. The fashion, the hair, the colors and patterns. Not that the 80's were much better. But with all the neon, they were certainly much brighter, haha.
Have a great week!
-Teddra
Subscribe to:
Posts (Atom)


