Wednesday, May 30, 2012

Strawberry Almond Scones


Hello and happy Wednesday to you.  How's your week going so far?  I like these short weeks ..... before you know it, it's over!  I continued with the strawberry theme this week on Adventures In Baking with a scone recipe.  This is a different recipe than the one I used for the berry scones with lemon glaze I made here.  This recipe is from the Tasty Kitchen blog and the full recipe can be found here.


The ingredients.  Fresh strawberries plus strawberry preserves.


Let's get started.  Combine the flour, baking powder, salt and sugar.  Cut the butter into 1/4 inch squares and add it to the flour mixture.  Using your hands, break up the butter until the butter pieces are no bigger than small peas and the mixture is crumbly.


Next step.  Make a well in the center of the mixture and pour in the milk and heavy cream.  Using a spatula, fold the mixture until the liquid is full incorporated.  Add the fresh strawberries, sliced almonds, strawberry preserves and lemon juice. 


Final step.  Transfer the dough to a lightly floured surface.  (Ick, it's sticky and squishy and goopy.)  Lightly coat all sides of the dough with flour.  With your hands, carefully press the dough into a 1/4 inch thickness.  Using a 2-inch rough biscuit cutter, cut rounds of dough and transfer them to a baking sheet.  I don't have a biscuit cutter but I do have a 3 1/2-inch round cookie cutter so mine are a little bigger than intended. 

Taste test.  They're pretty.  They taste ..... like ...... nothing.  Dry, with no flavor.  Might as well be a foam pillow.  A tiny one.  And I tasted the strawberries before I cut them up.  They were nice and sweet.  The only thing that saved these babies is topping them with strawberry preserves.  Sigh.  I was so looking forward to these. 


The clean up.  I only made 6 scones because my cutter was almost twice the size of the cutter recommended in the instructions.  It was 5 too many.  P.S.-They weren't better the next day :- ( 

On the next episode of Adventures In Baking ..... We're going on the road again and I have a recipe for something a little different than what I've been doing.  It sounds delish so I hope it turns out well!  Check back here next Wednesday to find out!
Till then
-Teddra


Tuesday, May 29, 2012

Graduation Congrats


Hi!  How's it going?  Just fine here.  I just wanted to share a graduation card I recently made for my cousin that graduated from High School.  The school colors are blue and gold so I used a graduation cap and tassel stamp from Papertrey Ink's Tag-It's collection to stamp a little background.  The blue ink is Enchanted Evening and the gold ink is Harvest Gold.  Everything is stamped on white cardstock and layered with Enchanted Evening cardstock onto a Kraft card base. 

I don't usually do much stamping on the inside of cards, but thought I'd add a little something to this one.


Congrats Jordan!

See ya back here tomorrow for the next installment of Adventures In Baking!
-Teddra

Friday, May 25, 2012

Papertrey May Blog Hop Challenge


Welcome to the Weekend!  Don't ya just love Friday.  Especially at the start of a three-day weekend.  What do you have planned this weekend?  It's supposed to be in the 90's here on Sunday and Monday so my plan is to enjoy a little sunshine, but also spend a little time in the pursuit of crafty endeavors in the air conditioning. 

I'm not generally able to participate in the monthly blog hop activities at Papertrey Ink, but when I saw the inspiration photo for this month, I couldn't resist breaking out the crafty.   I'm really happy with how it turned out.


Thanks for stopping by
-Teddra

All supplies from Papertrey Ink unless otherwise noted
Cardstock:  Simply Chartreuse, Stampers Select White, True Black
Dies:  Heart Border, Large Scallop Border, Signature Series: Butterfly
Ink:  Simply Chartreuse, Tuxedo Black (Memento)
Patterned Paper: Bitty Dot Basics
Stamps: Background Basics Test Style, Background Basics Tin Type, Mat Stack 3

Wednesday, May 23, 2012

Strawberry Pretzel Squares


Hi and welcome to Adventures In Baking!  I'm continuing the Strawberry theme I started last week with a dessert that's perfect for summer.  I was blog surfing and found the recipe here at Cookies and Cups.  My mom has made this before and I really like the combination of sweet and salty so I thought I'd give it a try.  There isn't much baking involved, but I did use the oven to bake the pretzel crust and I used a hand mixer for the cream cheese and cool whip layer.  So by minimal standards, this counts as baking.  Plus, it's my blog and I really wanted to try it out! 


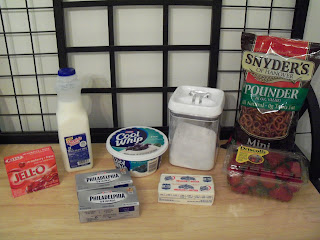
The ingredients.  Not much goes into it, but the combination of ingredients ensures something good comes out.  Oh, and one ingredient I forgot to photograph.  Water.  Hot and Cold.  For the jello. 


Let's get started.  Finely crush 2 cups of pretzels.  For this step, I relied on the superior crushing skillz I developed from crushing graham crackers for the S'mores cookies I made here.  Don't ya just love my tiny rolling pin?  That's a quart size zip lock bag I'm crushing so the pin's about 6 inches long (not including the handles).   Petite, haha.  Mix pretzel crumbs, sugar and butter.  Press into bottom of pan.  Bake.  Cool.  And catch up on a little cleaning while you wait.
PS.  I've learned my lesson on pan size: Recipe says 13x9 inch pan ..... I use a 13x9 inch pan.  No more overflow for me, Lol!


Next step.  Beat cream cheese, sugar and milk until blended.  Stir in Cool Whip.  Spread over crust.  Refrigerate.  And sort the laundry and get the first load going.   


And then.  Add boiling water to gelatin mix.  Stir in cold water.  Refrigerate.  And dust and vacuum the entire house.


Final step.  Stir berries into gelatin and spoon over cream cheese layer.  And.....you guessed it......Refrigerate.  One benefit of this recipe is that it takes so long due to refrigerating each layer, you'll have a clean house by the time it's ready to eat! 

Taste test.  Perfection.  Cool, sweet, salty, crunchy.  And no chocolate. I know, I know.  That's just blasphemous to all you chocolate lovers out there.  This is so good, I haven't shared a single bite with anyone else.  Hello, my name is Teddra and I'm a jello pretzel dessert hoarder.  Don't judge.  Make it for yourself and see what I'm talkin' bout. 

The clean up.  If you are a normal person, this dessert could probably be cut into a reasonable 18-21 pieces.  My pieces have been slightly larger.  Slightly, lol!  I've just been cutting as I go.  The real downside to making this dessert is the time between layers to chill in the fridge.  Definitely couldn't make this one on the fly. 
Well, that's it for today.  I deserve a treat after all this typing so I'm off to enjoy another piece of dessert!  I might just continue with the Strawberry theme next week......I have a couple recipes in mind. 

See ya back here soon
-Teddra 

Monday, May 21, 2012

Strike A Pose


Hi-ya!  Just a quick post of one last (at least until I get some pictures of the actual ceremony, but knowing these two that could take for - ever) Hawaiian Wedding layout.  Just a couple of pictures of everyone standing around getting their picture taken.  


Close up of the left side:

And the right side:


I used patterned paper and embellishments by My Mind's Eye.  I seem to be on a blue and yellow kick lately and it helps that there are so many pretty papers out there right now. 

Looking back at the past few months, I've noticed my card making has pretty much become non-existent. I only made it through February before my monthly Christmas card resolution fell apart. I had a couple of occasions that needed cards so this past weekend I broke out the ink, stamps and cardstock. I inked up a few of my newer stamps and am still itching to make a few more cards. I'm waaaaay behind on project life pages but I'm not stressing about it - I'll get to it when I get to it.

Are you ready for the next episode of Adventures In Baking? Check back Wednesday to see what was on the menu this week!

-Teddra


Wednesday, May 16, 2012

Lemon Cupcakes


Hi!  How's your week going so far?  Mine has been just peachy and I'm sure looking forward to the weekend.....although it's supposed to be HOT.  Middle of the summer hot.  Bring.  It.  On. 

In my blog search for recipes, I've found that food and/or dessert bloggers tend to be split into two camps:  Those that like fruit in their desserts and those that do not.  The 'do not's' are very adamant that unless it involves chocolate, fruit is on par with vegetables and vegetables do not belong in desserts.  I'm in the 'like' camp (and preferably without chocolate).  While my top fruit choices include pineapple and kiwi, hands down my favorite is the strawberry.  Today's little delight is brought to you by the recipe of Baked Perfection.  You can find the full cupcake and frosting recipe here.


The ingredients.  So many ingredients for such a little cupcake.  The recipe calls for 4 teaspoons of lemon zest and 4 tablespoons of lemon juice.  I wasn't sure how many lemons that would be so I bought four and some lemon juice in case it wasn't enough.  I thought the sour cream was a little weird but I'm just rollin' with it.


Let's get started.  Combine the flour, baking soda, baking powder and salt in a bowl.  In a separate bowl, cream the butter and sugar.  Beat in eggs one at a time.  Add the lemon zest, lemon juice and vanilla and mix well. 


Next step.  Add the flour mixture to creamed mixture alternately with sour cream.  You will have a very full bowl of batter.  Fill the muffin cups and bake.


Final step.  The frosting.  Strawberry Buttercream.  'Nuff said.  Just kidding!  Beat butter and vanilla until creamy.  Mix in strawberry jam and salt.  Add powdered sugar 1 cup at a time, beating until combined.  Add milk 1 tablespoon at a time until desired consistency.


Taste test.  I had a couple of taste-testers in the house for the weekend so I put them to work!  I didn't tell them the flavors before they took their first bite and wanted to see if they could identify the flavors by taste alone.  To my disappointment, they couldn't.  I had tasted the frosting before filling the piping bag and thought it was very good and not too sweet, but I hadn't tasted the cupcake.  I agree the cupcake could have used more lemon but the frosting was just right for my taste.  


The clean-up.  The recipe made 30 cupcakes.  The frosting recipe called for 6 cups powdered sugar, but I've learned from my few prior cupcakes that I don't use all of it and ends up wasted so I only (ha, only!) used 4 cups of powdered sugar.  I still had a little left over, but it didn't feel quite so wasteful.  I sent a container of cupcakes home with my weekend guests and took the remainder to work.  The guys at work are really liking my baking adventure!

On the next episode:  It's an oldie, but a goodie. 

See ya next time
-Teddra 


Saturday, May 12, 2012

The Pacific


Hello and welcome to the weekend!  I have a busy weekend planned so I'm just going to jump right into the layout.  These are a few of the pictures from the beach where my brother got married.  The house they rented for the week sat right on the beach so all day they had these amazing views of the waves and then each night were treated to a spectacular sunset. 


Patterned papers are from Studio Calico's Memoir Collection.

That's it for today, but have a great weekend and Happy Mother's Day!
-Teddra 

Wednesday, May 9, 2012

Brown Sugar Crinkles


Hi and welcome to a delicious episode of Adventures In Baking!  I'm just gonna put this out there ...... these are the BEST cookies I've ever tasted.  I didn't think anything would ever come close to the Peppermint Chunkies I made here, but these are so yummy (and super addictive).  Let's get right to it.


The ingredients.  Simple enough.  Dark brown sugar instead of light brown sugar.


Let's get started.  Beat brown sugar, butter and vanilla until creamy.  Add eggs, one at a time.  Beat in baking soda and salt.  Add flour and pecans, stirring until smooth.


** The recipe called for toasted pecans. Being the inexperienced chef I am, I had no idea how to toast pecans. I was picturing taking a kitchen torch (maybe not an actual torch, but whatever those things are you use on creme brulee). Turns out all you have to do is melt a little butter, mix in pecans and stick em in the oven for 5 minutes at 350 degrees. Easy peasy.  After removing them from the oven, I laid them out on some wax paper to cool.  And they smell soooooo good. Bet that little torch thingy would have been a a lot of fun, LOL! 

Next step.  Cover and refrigerate for 1 hour.  How did I spend my hour?  I took the opportunity to run to a LSS to see what they had on sale for National Scrapbook Day.  Scored a couple of good deals and now back to finish the cookies! 


Final step.  Place confectioners sugar in a shallow bowl.  Roll dough into balls and then into sugar. 


Taste test.  One word....YUM.   More nutty than sweet.  Chewy with a crisp outer shell.  I'm still snacking on these 4 days later.  These would be good year round and for any occasion.  Next office bring-food event, these are gonna be on the menu.  And I may keep a few for myself, haha.


The clean up.  This recipe said it made 4 dozen cookies and I ended up with 44.  (Ate too much of the dough!).    

On the next episode, it's Mother's Day weekend and I've got my baked good recipe picked out and am looking forward to the taste test!

Have a great week!
-Teddra


Monday, May 7, 2012

Married In Paradise


Hi and welcome to Monday.  I have a few more wedding layouts to share this week and I would like to apologize right from the start about the quality of the photos.  They are terrible.  It was cloudy and stormy all weekend (but hot and humid to extremes) so not only was the light source very poor, I couldn't get the camera to focus for anything.  I guess it's time to stop stalling and just purchase the light box I've had on my Amazon wish list for months. 


The left side view is a little better focused, but I cut the top off the page (grrrrr!).  Blue and yellow, one of my top favorite color combos. 


And a close up of the right side.  At least I was consistent in cutting off the top of the page, LOL!

I used patterned papers and embellies from Prima.

Thanks for stopping by
-Teddra

Friday, May 4, 2012

Time To Celebrate


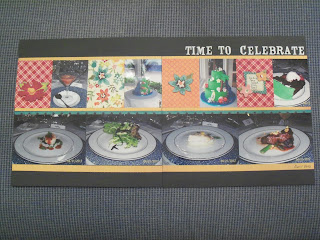
Hi and Welcome!  I have another wedding layout to share today.  The layout is all about the food!  The wedding dinner was catered at the beach house so everyone was able to enjoy this delicious food and have the amazing Pacific Ocean in the background. 


The dinner consisted of six courses: Scallop, Soup, Salad, Fish, Beef and Dessert.  It all looks scrumptious.  The island cake was personalized for Brian and Lan and was decorated with  a waterfall, palm tree and surfboards with their initials.
 

I used Crate Paper patterned papers and embellishments from the Farmhouse Collection. 

Thanks for stopping by
-Teddra


Wednesday, May 2, 2012

Peanut Butter Pretzel Bites


Hi everyone!  Are you ready for this week's Adventure In Baking?  This week combines what may possibly be my favorite flavor combination when I'm looking for a sweet treat.  It's crunchy, creamy, sweet and salty.  It's peanut butter, pretzels and chocolate.  And, in the spirit of full disclosure.....there isn't actually any baking.  I used a mixer.  And a cookie sheet.  But no oven.  While I was trying to figure out what to make this week, I went back to the site that inspired this whole adventure of mine ...... the blog at Baked Perfection.  And you can find the full recipe here. 


The ingredients.  Not really baking anything so no flour or baking powder.  But, there's only 6 ingredients plus whatever chocolate you want to use.


Let's get started.  Mix together the peanut butter, butter, vanilla, powdered sugar and salt.  The powdered sugar gives the whole thing an odd consistency.  It's smooth, but kinda fluffy. 


Next step.  Roll into balls and place on a pretzel; top with second pretzel.  Basically, make a bunch of miniature peanut butter sandwiches.  And I mean a bunch!


And then.  Chill in freezer for 20 minutes.

Final step.  Melt chocolate and gently dip the pretzel bites into the coating.  Place on wax paper to dry.  I have not perfected my dipping technique, but this was an improvement over the truffles I tried here.   I like adding the little drizzle of chocolate on top.  It hides the rough spots!  I only had two bites fall apart in the chocolate and they were towards the very end.  There were so many to dip, they'd been out of the freezer almost 45 minutes by the time I got to them so they weren't sticking together too well. 


Taste test.  I ran out of white chocolate and pink candy melts.  I went to my baking cabinet (baking has taken over my limited kitchen space) and the only chocolate/candy melt colors I had left were red and green.  Since I'd previously used red on the truffles, I went with green.  Not a very appealing choice. 

They taste ..... sweet.  I tried one before I dipped it in chocolate and really like it.  Kinda like a Nutter Butter cookie.  After chocolate, meh.  I ate one and had no desire for another.  Too, .......I can't put my finger on what exactly I don't like about it.  They aren't bad, just not to my taste.  They look cool all lined up though!  

The clean up.  The recipe made 56 bites.  I was afraid I was going to run out of pretzels!  Gave half away, saved some for the freezer and took the rest to work.  They were gone BEFORE we made it to morning break.  I work with a bunch of guys that will probably eat anything that's placed in front of them, but I think that's a speed record.

On the next episode of Adventures In Baking I'm doing a cookie.  I have the recipe picked out, the supplies purchased and am looking forward to trying it out.  

Keep it sweet
-Teddra